The method to install windows 7 & windows 8 with the help of a usb device is much easier than installing windows xp with the help of a boot able usb device.
Thanks to Microsoft that they provided us with a tool for making a
bootable usb to install windows and as far as I have used, it doesn't
work with windows xp but you can use it for windows 7 and windows 8. To
make a bootable USB with the help of this tool you need:
Download the Windows 7 USB/DVD download tool from Microsoft website. Its very easy to find on the internet but you just Click here to download the tool.
Step 2:
Get a backup of Windows 7 or Windows 8. You can download that from internet, I could have posted a link here from torrent but its illegal. I recommend you buying windows or downloading it if you are a university student and your university is giving software for free.
Step 3:
Install the Windows 7 USB/DVD download tool which you have downloaded in the first step. Follow the steps in the installation wizard which is just to click the next button when needed. After finishing the installation, run the tool which will open a wizard.
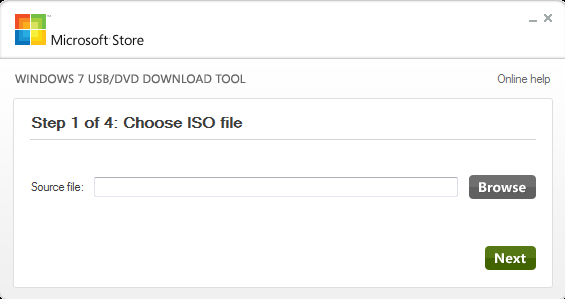
First, select the windows iso file which you have downloaded and click Next.
After clicking Next, you will get the following options. Click on USB device as you want to make a bootable USB.

In step 3 of this wizard, you will be asked to select the USB device. Insert your USB device and select it from the drop down list. And then Click on the Begin copying button.

Wizard will begin copying windows files onto your USB Drive.

After the wizard has finished copying the files. Click Finish.
Now your boot able USB drive is ready to be used. Boot your computer form the USB drive and install the windows.
Enjoy!!! :)
- A USB device with minimum 4 gb space.
- Windows 7 USB/DVD download tool
- Backup of Windows 7 or windows 8 in the form of an ISO file
Download the Windows 7 USB/DVD download tool from Microsoft website. Its very easy to find on the internet but you just Click here to download the tool.
Step 2:
Get a backup of Windows 7 or Windows 8. You can download that from internet, I could have posted a link here from torrent but its illegal. I recommend you buying windows or downloading it if you are a university student and your university is giving software for free.
Step 3:
Install the Windows 7 USB/DVD download tool which you have downloaded in the first step. Follow the steps in the installation wizard which is just to click the next button when needed. After finishing the installation, run the tool which will open a wizard.
First, select the windows iso file which you have downloaded and click Next.
After clicking Next, you will get the following options. Click on USB device as you want to make a bootable USB.

In step 3 of this wizard, you will be asked to select the USB device. Insert your USB device and select it from the drop down list. And then Click on the Begin copying button.

Wizard will begin copying windows files onto your USB Drive.

After the wizard has finished copying the files. Click Finish.
Now your boot able USB drive is ready to be used. Boot your computer form the USB drive and install the windows.
Enjoy!!! :)


